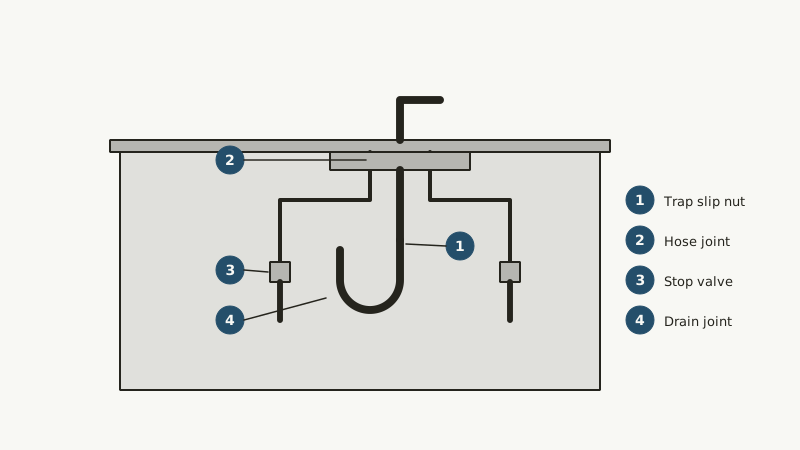
Empty the cabinet and find the one wet spot before you pick up a wrench. Nearly every leak down there is a slackened slip nut, a flattened washer in the trap, a bulging supply hose, a shutoff valve weeping at the stem, or a seal that has failed where the faucet or strainer meets the sink. Repairs are small. A kitchen with a disposal has an extra suspect, handled under garbage disposal repair, so go there if the wetness is beneath the grinder.
How do I pin down the exact source of the drip?
Dry every pipe, run the water, and touch a fresh square of tissue to each joint in turn, starting at the faucet and working down: supply hoses, then stops, then drain. The first tissue to darken marks the culprit. Water runs downhill and can travel along a pipe, so always look higher than the puddle.
Spread an old towel across the cabinet floor and park a small bowl beneath the trap. Run just the cold tap for a minute, then the hot. After that, fill the basin and release the plug, because some drain joints seep only when a heavy rush of water goes through. Wipe the pipes dry between tests, since a damp pipe gives false alarms. If the drip appears only while the dishwasher or disposal runs, the problem is on that machine's hose or connection. EPA lists tired washers and gaskets among the usual faucet leak causes and suggests checking the outside of fittings for moisture. It also estimates that one drip every second adds up to well over 3,000 gallons in a year.
Which part is leaking, and what cures it?
Wetness tells you the part, and the part tells you the cure. Slip nuts and washers lead the list, followed by the supply connections and then the valve stems. The table below pairs each location with its cause and a first remedy, so you can pick the repair before buying anything.
| Where it is wet | Likely cause | First remedy |
|---|---|---|
| Slip nut on the curved trap | Loose nut or flattened washer | Snug by hand, replace washer if it still weeps |
| Strainer body below the drain opening | Dried-out putty or gasket | Take it out and reseat with fresh putty or its gasket |
| Hose end at the faucet or stop | Worn washer or loose nut | Tighten slightly, or fit a new braided line |
| Stem of a shutoff valve | Packing nut leaking | Nip up the packing nut, or replace the valve |
| Base or handle of the faucet | Dead gasket or O-ring | Rebuild or replace the faucet |
| Wall of the pipe, with green or white crust | Corrosion | Replace the section, see the pipe section below |
Before any of it, turn both stop valves clockwise to snug, and open the tap to let trapped pressure out. A stop that will not shut, or that drips when shut, sends you to the house main and a shopping trip for new valves. Do not force a stiff old one; it can snap and start a bigger leak.
What is the method for a leaking trap or drain joint?
Put a bucket below the U-bend, loosen the slip nuts by finger and lift the trap free. Examine each washer. A cracked, flat or missing one gets replaced, seated the same way the old one sat. Rinse the threads, put the pieces back hand-tight, and give a quarter turn more only if the joint still sweats.
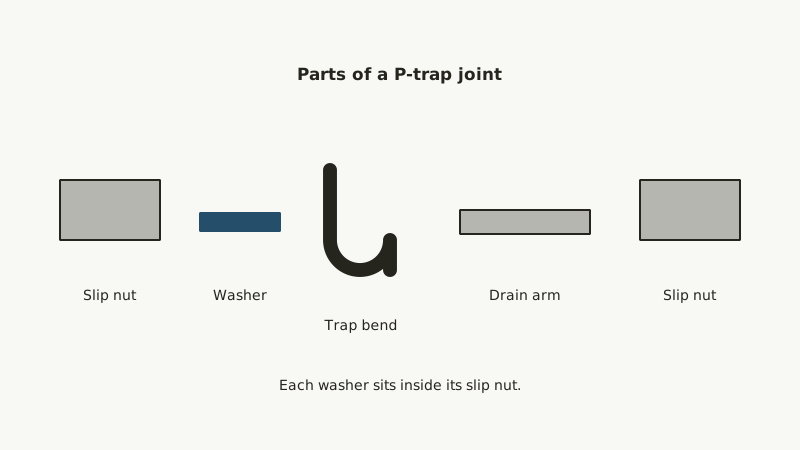
Leave thread tape out of slip joints, because the washer is the seal and overtightening cracks plastic nuts. Plastic traps often leak since the pipes meet at a slight angle, so shift the trap arm until every piece mates without being pushed. When water gathers only with a full basin, inspect the strainer body above. Thin, pitted or green metal is a poor candidate for patching; a fresh trap kit is the sensible answer. A sink that also crawls may have a blockage leaning on a weak joint, which the slow-draining sink guide deals with.
And if the supply hose or the stop valve is the one leaking?
Swap a weeping supply hose for a new one; braided lines are inexpensive and cannot be mended. Close the stop, unscrew both ends, thread on the new hose, and snug it until it seals while a second wrench holds the valve still. A valve that leaks at the stem often calms down after a slight turn of its packing nut.
Test each connection with a dry tissue, then look again an hour later. A valve that drips from its body or refuses to shut needs replacing, which means closing the house main first; with old, crusty or soldered stops the better move is a plumber. The write-up on fixture shutoff valves shows what a plumber checks. Dripping from the faucet itself belongs to fixing a dripping faucet, and a whole new faucet is priced in faucet installation cost.
What if the pipe itself is the failing part?
If the metal is rusted through, flaking, swollen or pinholed, any patch is temporary, and old galvanized steel or corroded copper should be replaced. Get a plumber when the pipe flakes under a fingertip, when the water seems to start inside the wall, or when several joints are damp together.
Long Beach's plumbing page says a permit applies when piping or a fixture is installed, altered, repaired or replaced, apart from stopping leaks or repairing defects without new materials. A fresh washer almost certainly falls under that exception; new pipe may not, so ask Building and Safety. Plenty of Long Beach houses raised in the interwar and postwar decades keep their older metal lines, and the utility's 2025 water report lists hardness averaging roughly 76 ppm in one zone and 220 ppm in the other, so crusty scale at joints is a familiar sight in older kitchens. When to replace rather than patch is the subject of galvanized pipe replacement, and the other typical failure is described in copper pipe pinholes. A leaking pipe repair lands at roughly $228 to $752 in Thumbtack's April 2026 national data. If the cabinet floor has already swollen, you can ask for a visit via the quote page; California sets a $1,000 threshold of labor and materials for contractor licensing, so look up whoever you hire on the state board's site. What else we line up is on the Harbor Lights home page.
Can putty or tape hold things until morning?
For a pinhole in a clean, dry pipe, yes. Epoxy putty, a repair clamp or self-fusing tape can plug it until the part is replaced, though none is a lasting fix on a joint carrying pressure. Keep the stop valve closed meanwhile if possible.
Dry the pipe, scrub the spot shiny, follow the cure time on the packaging, and leave a bucket under it. Straight pipe takes these products better than threaded joints, and they cannot cure a dead washer. A fuller comparison is in pipe leak sealants. If the seep returns, the part itself has to go.
Common questions
The cabinet stays dry until I turn the faucet on. Why?
The joint is probably loose or its washer is worn, and it opens only under flow. Inspect supply hoses while the tap is on and drain joints while the basin fills or empties. A drain joint that leaks only when a rush of water goes by is usually the slip nut at the trap, so tighten and test again.
Is it okay to repair this with the supply on?
Not a good plan. Turn the stop valves under the sink first, which cuts the flow to the faucet and keeps parts dry to work on. When a stop will not close, shut the house main at the meter. Wrenching on a pressurized line invites a bigger flood and a poor repair.
How long will this take me?
Snugging a nut or dropping in a washer takes minutes; a supply hose or a trap kit takes under an hour for most people with ordinary tools. Putty and sealants have drying times on the label. A seized valve or a crumbling pipe turns it into a plumber's job.
Should I bother with a tiny drip under there?
Yes. Water under a cabinet rots wood and can breed mold where nobody looks, and a slow weep today often grows. Repair it before the floor of the cabinet swells, then test again a day later with a dry tissue to confirm the joint is holding.
References
Updated