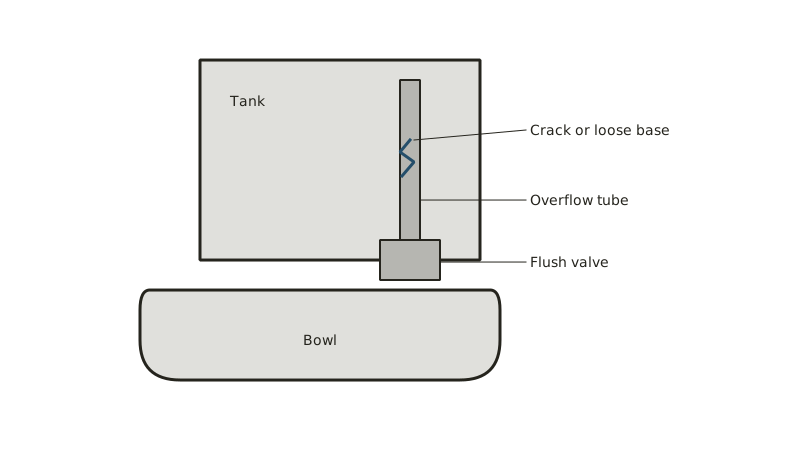
Inside the tank, the overflow tube is a safety drain. If the fill valve ever fails to shut off, water climbs the tube and spills into the bowl instead of onto your floor. A tank that runs while water pours down that pipe shows the tube working as designed; the real culprit sits earlier in the chain. The sections below separate the two cases. The wider fixture is on the toilet repair page.
Is the tube itself to blame?
Seldom. Water streaming steadily down the tube means the fill valve or float admits too much, so the tube is innocent. A level far below the tube with a tank that still bleeds into the bowl implicates the flapper or the seat beneath it. Only a crack, split or loose joint puts the fault in the tube.
A quick test narrows it down. Dry the outside of the tube with a towel and watch for a bead of water at a crack. Press gently around the base and listen for a wobble. A plastic tube that has been twisted during an earlier repair can crack at the base, and an old brass tube can corrode through.
Next, look at the waterline. Target roughly an inch beneath the tube's top edge, or the mark molded on the tank. A higher level leaves no margin, so any surge spills over. That is an adjustment of the float, not a reason to replace the tube. The page on replacing a fill valve shows that fix.
What are the real ways an overflow tube fails?
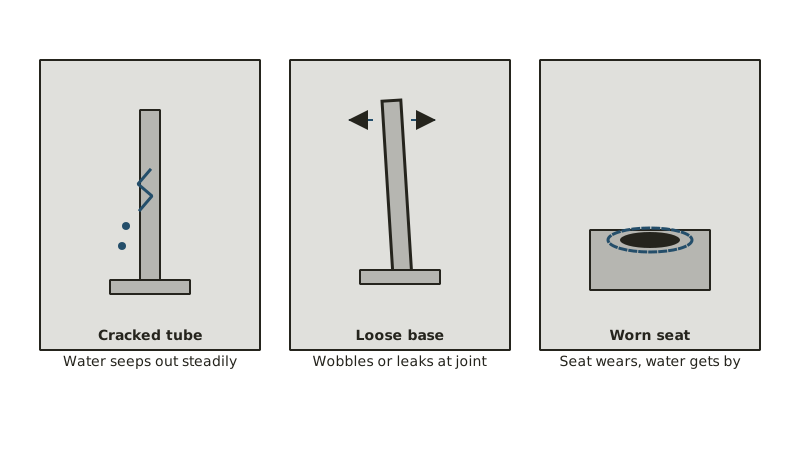
Three real failures exist. A crack or split lets water seep out of the tube wall, so the tank drains steadily into the bowl. A broken or loose base leaves the tube wobbling or leaking where it joins the flush valve. And on some designs, the tube is part of a one-piece flush valve whose seat is worn, so the leak is at the bottom of the same assembly.
Other things get mistaken for tube trouble. A flapper past its prime produces the same refill cycle, and the page on flapper replacement covers it. Also check the small refill hose: if it has been pushed down into the standpipe, water can siphon back from the bowl, and many makers say its end should clip on above the rim instead.
Debris matters a little. A bit of grit on the flapper seat or in the fill valve can mimic a tube leak, which is why careful cleaning comes before buying parts.
How do I fix a cracked or leaking overflow tube?
Because the tube and the valve body are molded as one piece on most toilets, a crack is normally cured by swapping the whole flush valve assembly. Shut off the water, flush the tank down, then either remove the tank to swap the valve, or use a repair kit made to fit over the existing seat without removing the tank.
Repair kits sold for this purpose, such as Korky's 2-inch universal flush valve kit, replace the flapper and seat and include a tube of sealant. The maker says its kit can be installed without removing the tank and takes under 15 minutes. It fixes leaks at the tank drain and corroded seats. It does not mention cracked tubes, so a cracked tube generally calls for a new assembly. Check which size your toilet has: 2-inch openings are the standard, but some toilets use 3-inch valves or one-piece designs such as certain Kohler models that need their own parts.
To replace the full assembly, you will need a new flush valve and tank-to-bowl gasket, a sponge and a bucket, and some patience. The sequence:
- Close the wall valve, flush, and sponge out what remains.
- Detach the supply line and remove the nuts holding the tank to the bowl.
- Carry the tank away and lay it face down on a towel.
- Spin off the big nut beneath it and draw out the old valve.
- Drop in the new valve and its rubber washer, then tighten the nut by hand, finishing with a modest extra twist.
- Set the tank down over a new gasket, bring both bolts down evenly, hook the supply back up and look for drips.
Do not overtighten. Porcelain cracks, and a cracked tank is the end of that toilet. There is a second route, laid out in a tank-in-place flush valve swap.
What if it still runs after I fit the new part?
Go back through the short list. Does the flapper lie flat, with slack in its chain? Where is the level relative to the tube? Are the connection nuts snug, and is the base dry? Then run the dye test: add dye to the tank, resist flushing for ten minutes, and see whether the bowl water changes color.
EPA recommends that dye check and points to worn flappers as the source of most toilet leaks, an inexpensive part. It says household leaks can waste 180 gallons per week, and toilets are often the cause. A leak after a new valve usually means a seat not fully sealed, or a gasket not seated.
Other reasons for endless running are collected in why a toilet keeps running. Water showing at the tank bolts or around the base is a separate fault, handled under toilet leaks.
When does it make sense to replace the toilet instead?
Replacement deserves thought when porcelain has cracked, when several parts are failing at once, or when the toilet dates from a thirsty era. EPA says older toilets can use up to 6 gallons per flush, and replacing them with WaterSense models can cut toilet water use by 20 to 60 percent, saving nearly 13,000 gallons and more than $170 a year.
The city issues a plumbing permit for a low-consumption toilet to the owner or a plumbing contractor, and one is needed for the swap. Changing parts inside the tank is repair work. Unsure which one you are doing? Building and Safety is at (562) 570-7648.
Prefer to leave the job to someone else? For a visit and a written estimate, send a request through the quote form.
Common questions
Why is there a tall pipe in the middle of the tank?
It limits how high the tank can fill. If the fill valve ever sticks open, water rises to the pipe's top and spills into the bowl, which spares your floor. The refill hose also sends a little water through it to top up the bowl's seal after each flush.
Is gluing a cracked tube sensible?
Epoxy may hold a hairline crack for a time, but I would not trust it. The tube belongs to the flush valve, which carries the load of a full tank, and a patched crack can reopen. A new flush valve assembly is the lasting repair, and it costs little next to a flooded bathroom.
What level should the tank water reach?
Roughly an inch below the top of the tube, or at the line printed inside the tank where there is one. Higher and the tank can spill into the tube; lower and the flush may weaken. Turn the float or the fill valve's adjuster until the level suits.
Is this one for a professional?
Often, when the tank must come off and that feels daunting, when bolts are rusted solid, when porcelain is cracked, or when the problem survives new parts. One visit lets a plumber change the flush valve, inspect the fill valve and test the toilet.
For the wider picture, start with Harbor Lights Plumbing plumber.
References
Updated